Training – Guide
Before you start to use the NMR facility, we want to make sure that you have understood all the information above. Therefore, your NOMAD account will be initially inactive and you will not be able to submit your sample. Please set your own password by going to NOMAD when connected to the University network, clicking on the profile login at the top right of the page and then reset password.
When you have your first sample, get in touch either with Tomas Lebl (tl12, room 129) or Siobhan Smith (srs9, office in the main lab – room 122) and we will quickly run with you through the workflow. You will also have opportunity to ask any questions you might have got and to become more familiar with us and the equipment.
Please do not hesitate to approach us if you are not sure about anything in the lab or you need to do any NMR experiments that are not currently available under automation.
- All users must familiarise themselves with the Risk Assessment before accessing the facility. A summary can be found online or on the main door to the NMR room along with the full risk assessment. If you would like a full copy then please just email us and we can send you it.
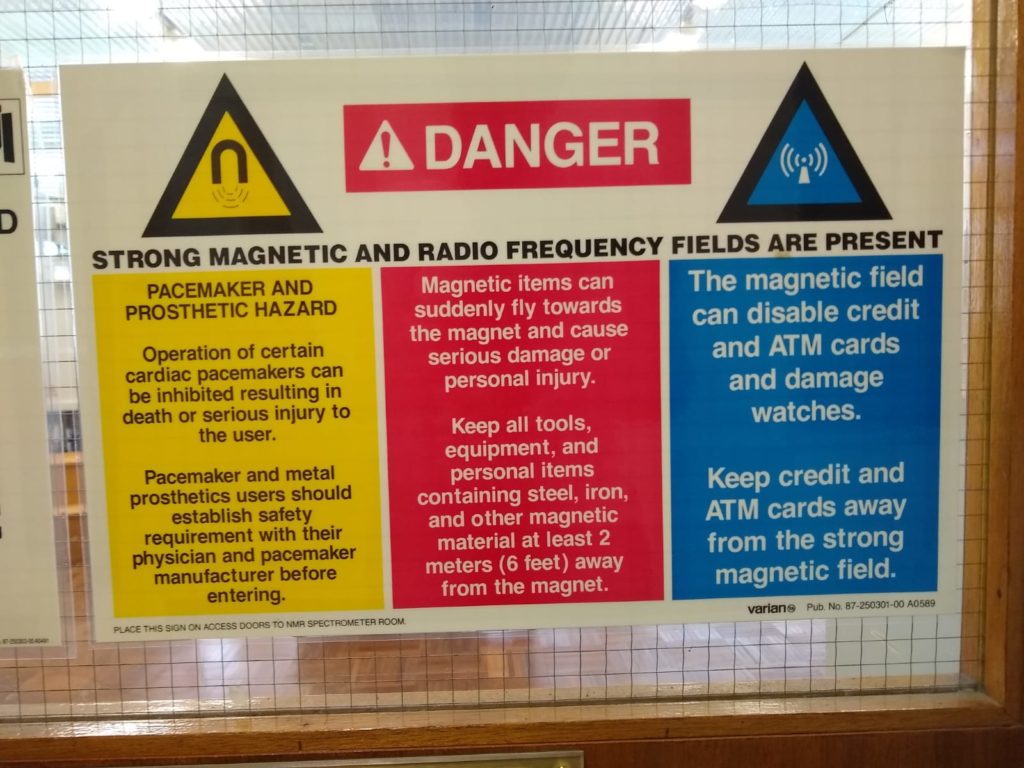
- There is a hazard of exposure to high magnetic field. If you have any metallic implants or a pacemaker please do not enter the lab and get in touch with us via e-mail or phone first and we will take your case from there.
- We do not take any responsibility for your belongings including those that could be damaged by magnetic field such as cards with magnetic strip, watches or electronic devices.
- Please do not wear lab coats and gloves in the lab
- The NMR facility operates 24/7. However, after working hours the doors will be locked. If you want to use the lab outside working hours, we can provide you with a punch code for the entrance door at your first visit to the lab. Please make sure, that the door is locked and lights are off if you are leaving the lab outside of working hours and nobody else is present.
- Nitrogen fills are usually done on Wednesday morning from 9am. During this time, there will be no instruments available. They will gradually come back online from around half 10. Status of the instruments can be checked on NOMAD. Any changes to this schedule or planned helium fills will be notified by email.
- Visit our website to make yourself familiar with available instruments and their capabilities
- Optimal sample volume should be around 0.6 ml.
- Using larger volume samples is waste of resources and extreme cases could hamper sample automatic sample changer operation.
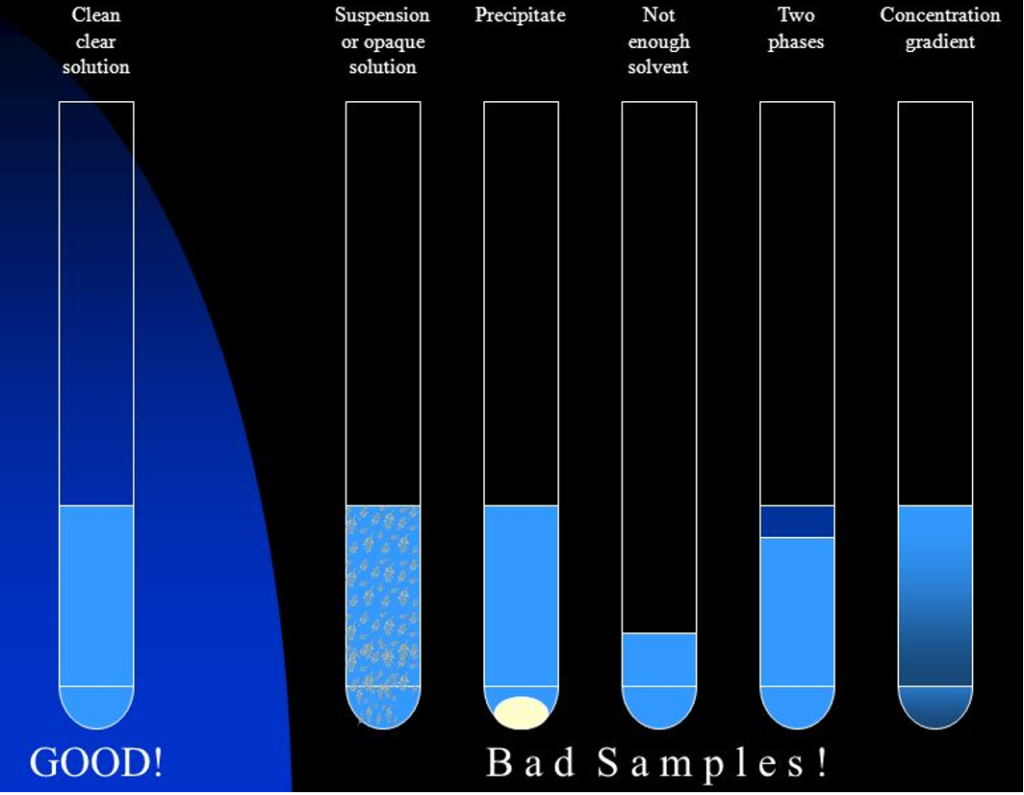
- The sample should be homogeneous clear solution.
- Bad sample preparation will result in poor spectrum resolution!
- Cracked NMR tubes must not be used under any circumstances!
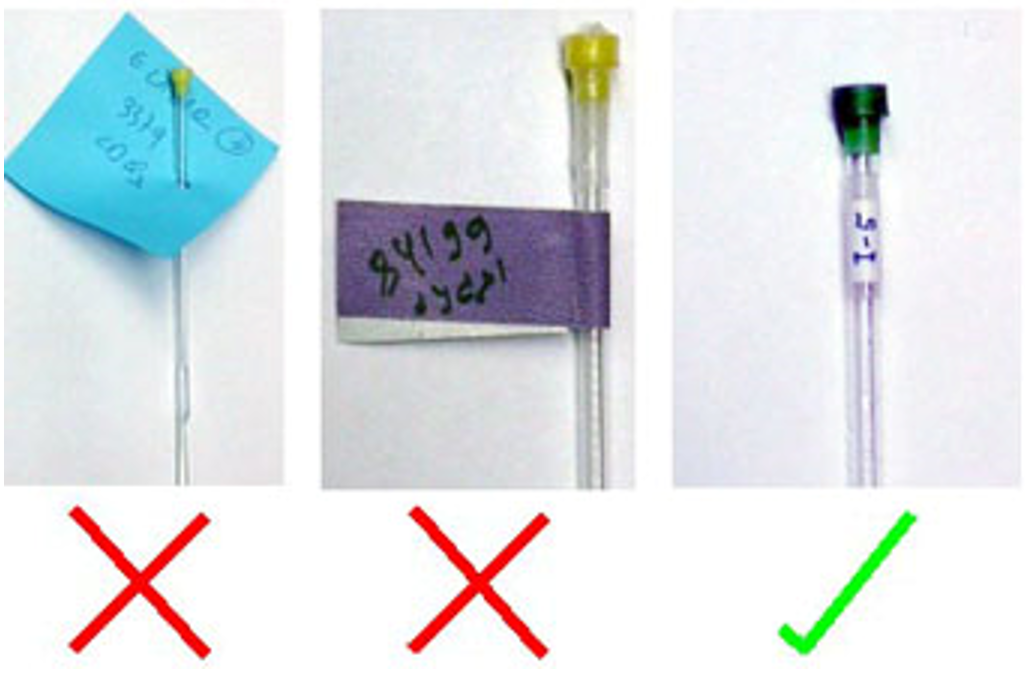
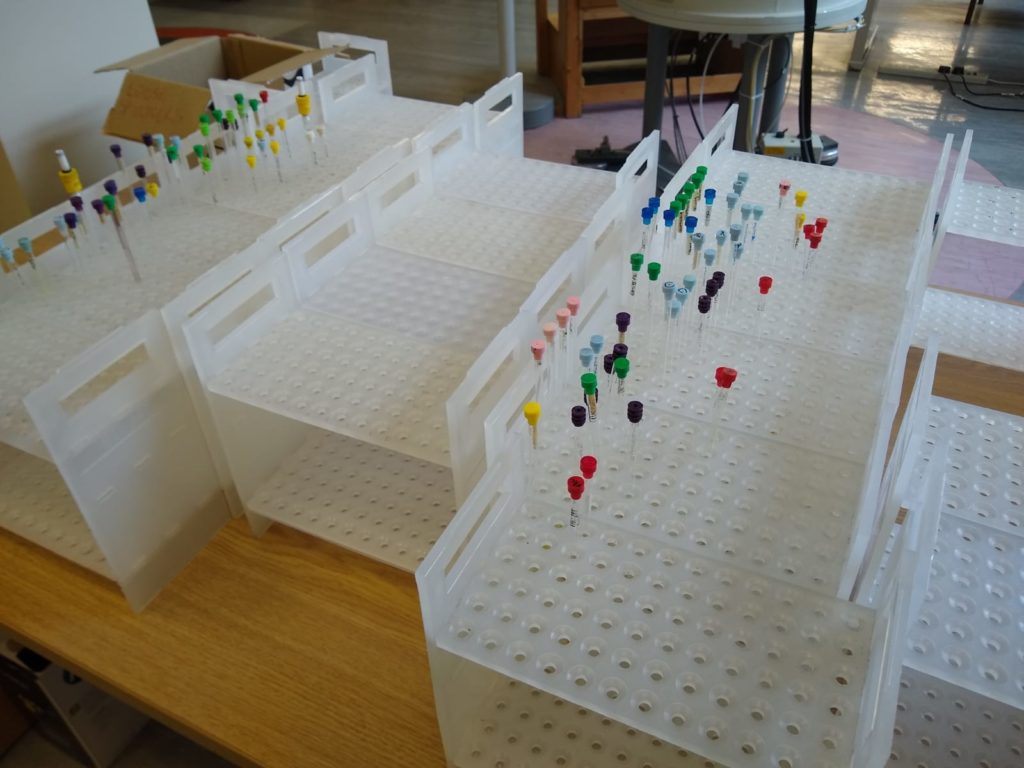
- Clearly label your sample by writing on the glass or cap.
- Nonconcentric labels are not allowed.
- The outside of the NMR tube must be completely clean of any substance other than the glass pen.
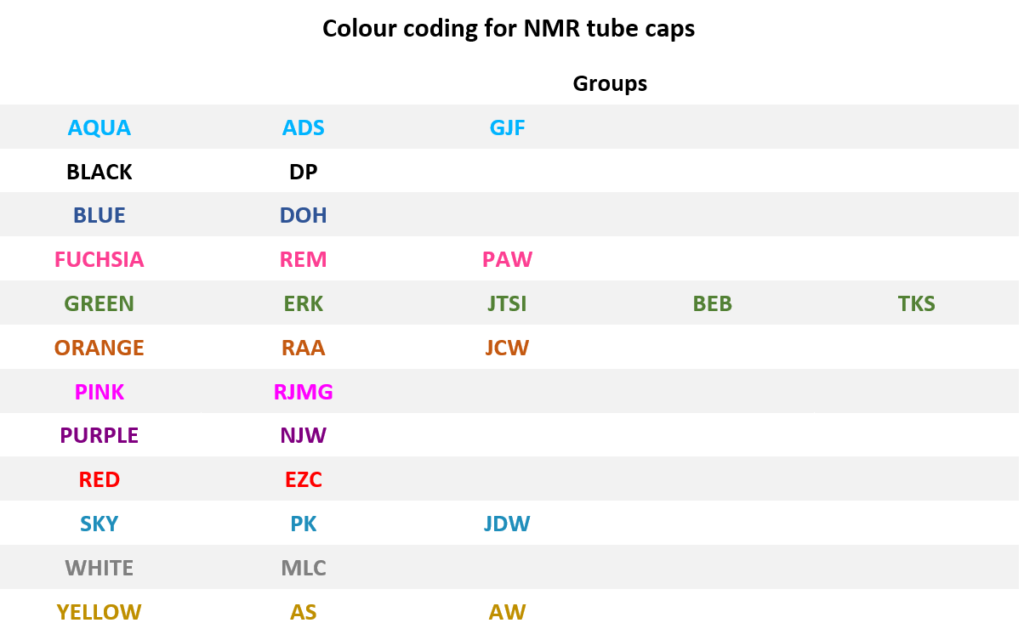
To help with tracking your sample, use NMR tube caps of colour that have been assigned to your group (see the table below). Using different colour cap is the main cause for lost samples.
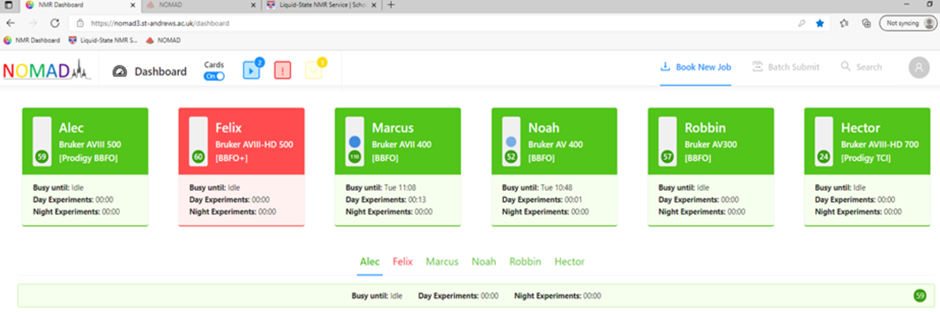
- Submission of NMR samples for automated acquisition is controlled by in-house build web-based software NOMAD. You can check the status in the NMR room at any time through the software.
- NOMAD 3 should already be running on the computer when you come to the NMR lab. You will eb able to see the status of each instrument – if they are green then they are available and if they are red then they are not. There is also a summary of when the machine is busy until and information on the length of queues for both day and night experiments (night experiments are longer experiments which run outside of usual operating times).
- To book an NMR sample:
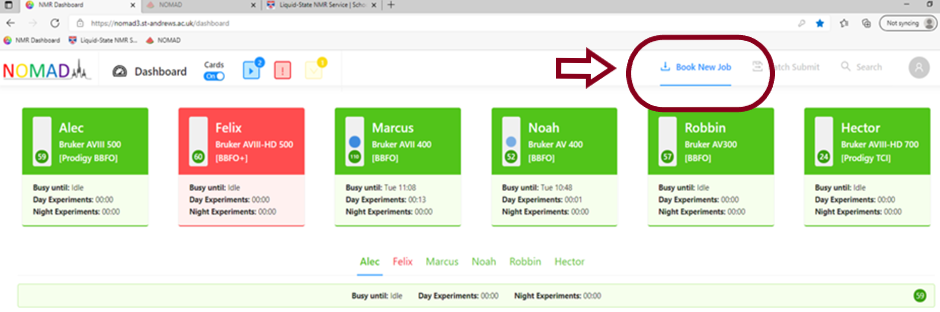
- Log in by clicking on the profile icon at the top right and then click on book new job. If this is the first time you have logged in then you will have to click the reset password link in order to set your own password.
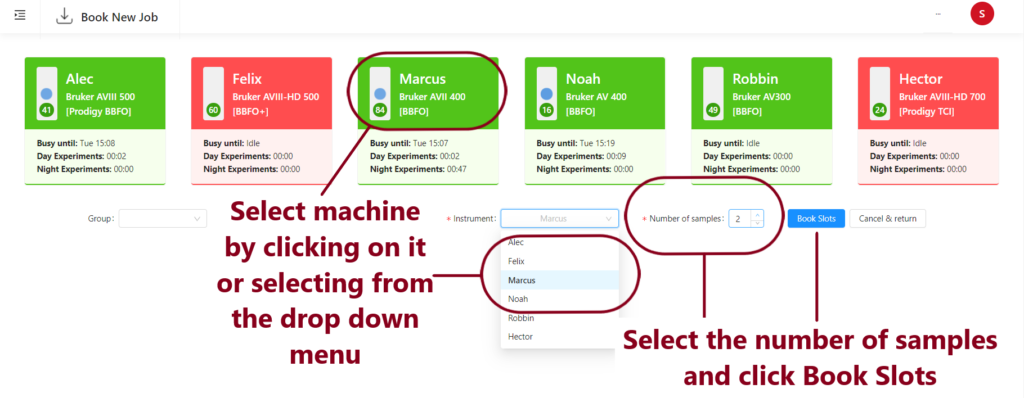
2) Select a machine by clicking on it’s summary card or using the drop down menu and then select how many samples you wish to run. Click Book Slots.
If you would like to run more samples on another machine, you can select and book the slots at this point. You will now have a list of booked holders (this is the numbered position in the sample changer where you will place your sample).
3) Fill in the generated form for each sample with the relevant solvent, a clear title (lab book number or similar), select the experiment you wish to run and adjust any parameters. If you wish to run several experiments on the same sample, use the plus and minus buttons to add rows to the form.
If you are using Young’s valve tube on Marcus or Noah set the parameter ro = 0.

4) Once you have filled in information for all the samples and experiments you wish to run, press continue. You should see a “Success!” message and your experiments will be added to the pending queue at the top of the page.
5) The samples must be loaded onto a spinner. The next video demonstration shows how to insert your sample into a spinner in the way that minimises contamination of inner parts of the instrument. When you put sample into the depth gauge make sure that it is pushed all the way down and spinner holds your sample firmly. Please try to avoid handling the spinners – tissues are provided to help you keep everything clean.
6) Put your samples into the correct holder on the correct machine (see the following section of instructions on how to use the automatic sample changers). If the holder is already occupied, please, return the spinner into the blue box and put the sample into the return racks. Each machine has own return racks for every day of working week and one for weekend (see “Retrieving Samples” tab for more details).
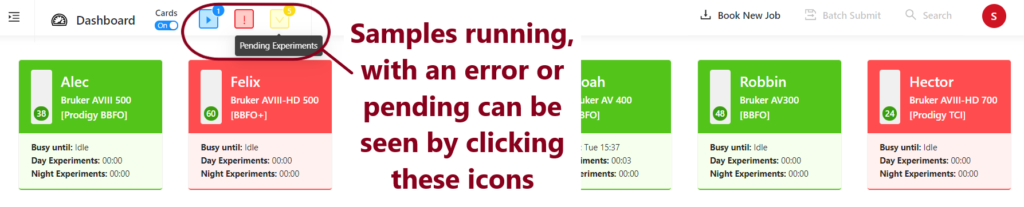
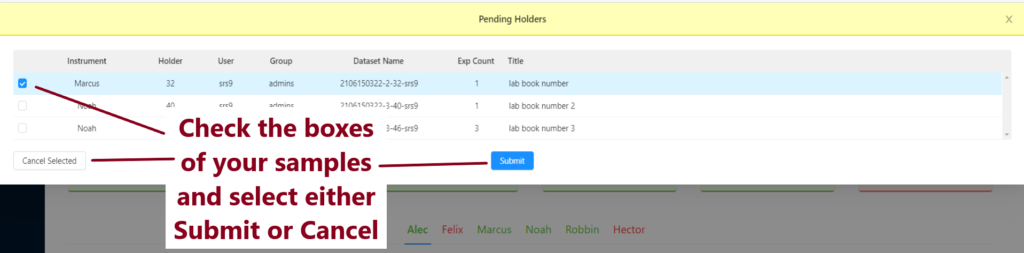
Click on Pending Experiments, check the box next to your samples and press Submit. If you do not wish to go ahead with your experiments, please press cancel selected in order to free up space in the queue.
You should again see a “Success” message and your samples will now be in the queue ready to run.
- Once all the experiments have been run on your sample, you can access your data through the same dashboard from any computer connected to the University network.
- If you have submitted an experiment and change your mind, please cancel it – log in by clicking on the profile picture logo at the top right of the page, find the experiment in the queue list and check the box next to it, press the cancel selected button at the top of the list.
- If your experiment is in the night queue, it will have a moon logo next to it in the list – this means it will run between 7pm and 9am the next morning. If the night experiments queue is longer than the 14 hours allocated then the samples will roll over to the next night.
The instruments in the lab are equipped by three different types of sample changers.
For BACS and SampleXpress we need to apply some rules listed below that help to assure smooth operation of the instruments.
Bacs
- Don’t use tubes shorter than 7’’. There is a 7’’ gauge at the entrance of the NMR lab where you can check whether your tube is long enough for BACS sample changer. The 7’’ tubes must be unspoiled and have no cracks at the top.
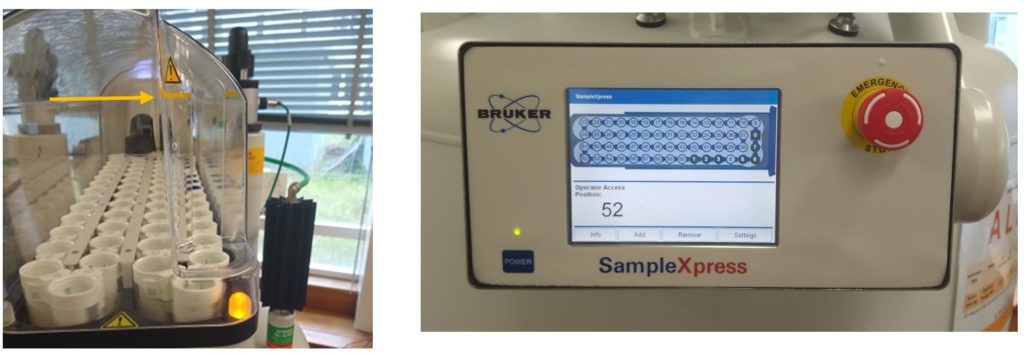
- If you want to insert your tube into a holder that cannot be reached you can move the conveyor belt by the buttons on the side of sample changer (see the red arrow in the picture below). If you do so, please pay attention. If the sample changer starts to operate release the button and wait until the sample changer finishes the operation.

- If you want to retrieve a sample that is just coming out wait until the operation is completely finished and the arm is in the upper position and pincers are closed.
- The BACS on Marcus has conveyor belt with 120 holders. Please pay attention to where you put your sample. The numbers 1-60 are in the inner ring and 61-120 in the outer ring. There is a sticker on the side of sample changer that helps to refresh you mind if you are not sure where to put your sample. We are currently only using the inner ring.
SampleXpress
- Do not use any tubes that are longer then yellow mark at the inlet port of the sample changer (see the picture below). The tubes with Young’s valve must be 5’’. The longer Young’s valve tubes are too heavy and don’t get eject from the magnet.
- To add or remove samples use the buttons on the touch screen to bring your holder in to the right hand corner where you can insert your sample. There are also buttons that allow to add remove series of samples in consecutive holders.
- Make sure that your sample changer has registered your sample (holder turned white). If your sample has not been registered take it out and put it back again.
How to operate the SampleXpress:
Sample Case
- SampleCase is very easy and intuitive to operate. There are no special rules – just press the arrow button if you need to mover the carousel to get easier access to your holder. There are specific spinners for this sample changer in Hector’s room.
You can come back and take your sample off the sample changer as soon as your experiments are finished. This is highly recommended especially if your sample is precious or you want to use it for something else as we can’t take any responsibility for the samples that you leave in the lab.
All samples remaining in the sample changers are transferred in the return racks by other users that come to use the instrument later. The racks are clearly organised by instrument and weekdays. The racks for lower field instruments (Marcus, Noah and Robbin) are on the desk near the entrance and for 500 MHz (Alec and Felix) are on the desk nearby the exit door. The return racks for 700 MHz instrument (Hector) are on the desk behind spectrometer PC.
All new NMR data generated can now be accessed directly from the NOMAD dashboard. Log in as you would to submit a sample and then press the search button.
You can now use to form to search your own data or others in your group. Check the box next to the data of interest and then click the Open NMRium button to view your spectra in the browser.
Alternatively you can press download to retrieve the zip file.
Historic data will still be available on NOMAD2.